My Hackintosh: Hardware and Undervolting
After six years with my i7 2600K system, I try some undervolting to get the temperatures of my new system under control.
Temperatures and hardware
Every Mac I’ve encountered ran hot due to timid fan speed curves and undersized heatsinks. The trade-off, though, is quieter operation. Traditionally, for processor performance, this didn’t matter much. As long as core temperatures stayed below the Thermal Junction Max (TjMax), the CPU maintained its clock speed. If temperatures rose above that, the CPU would throttle its speed or shut down to cool off. High temperatures also slightly increase power consumption (Gamers Nexus noted a 4% rise for every 10°C) and shorten the component’s lifespan. This behavior is seen in modern Intel and AMD CPUs, except for the newer Ryzen 2000 series, which, using Precision Boost 2, behaves more like a GPU.
GPUs, especially modern ones, react differently to heat. Nvidia’s GPU Boost dynamically increases clock speed based on core temperatures, power, and voltage, which reduces manual overclocking headroom compared to older generations (like Fermi) but boosts performance for users not interested in overclocking. When temperatures are low, you get great clock speeds without effort. As temperatures climb, clock speeds gradually drop to manage heat. In games and GPU-heavy tasks, this can visibly affect performance. In comparison, Apple lets CPUs run up to the 100°C TjMax under sustained load, while in my experience, dedicated GPUs in their systems hover around 80°C to 90°C.
Assembling the new hardware
By February 2017, I was still using my old system with these specs:
- Case: Cooler Master CM 690II Nvidia Edition
- Motherboard: Asus P8Z68 V-PRO
- CPU: Intel i7 2600K (overclocked to 4.4GHz)
- RAM: 2x8GB Corsair Vengeance DDR3-1600
- Graphics card: EVGA GeForce GTX 680 2GB
- Hard disks, etc. irrelevant
I was generally happy with its performance (having come from an Intel Core 2 Quad Q6600 and EVGA GeForce 8800GT), but when the system wouldn’t yield playable performance in DOOM (2016), it was time to move on. With the release of Intel’s 7th-gen processors (Kaby Lake) and the upcoming GTX 1080Ti, I figured it was the perfect time to build a new system. By early March 2017, the new build was ready:
Case: Lian Li PC-Q36
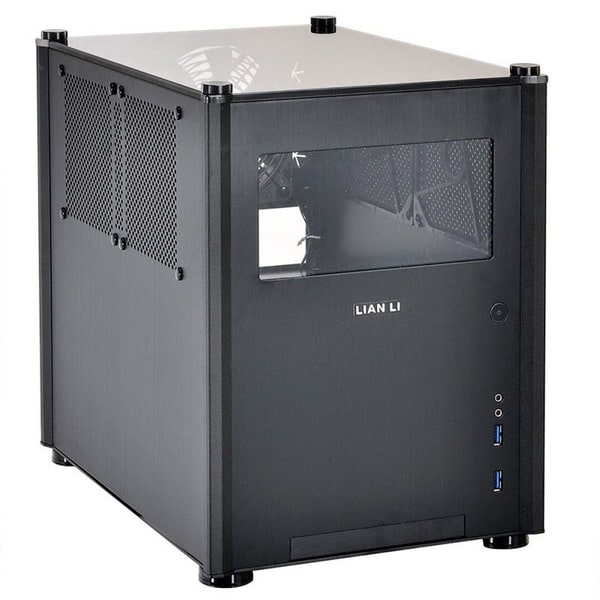
This time, I decided to build a Mini-ITX system to ditch the large tower. There were several cases to consider, like the NCase M1, the DAN Cases A4-SFX, and the Louqe Ghost S1, as well as older options like the Lian Li PC-Q36.
I first saw the Lian Li PC-V359 in der8auer’s Burst-Fire prebuilt systems from Caseking, and I liked the smaller PC-Q36 even more. Its design really appealed to me. Lian Li is known for unique, well-built cases, often made from aluminum rather than cheaper steel. The two-tier construction (PSU and hard disks at the bottom, motherboard on top) also suggested good airflow, ideal for the power-hungry components I planned to use.
When I was buying parts, the case was out of production already. Luckily, I found one from an Amazon Marketplace seller from Spain.
While I love the case, the Slimline optical drive slot bothered me. I don’t need an optical drive, but I also didn’t want the slot sitting empty. A card reader seemed like the perfect solution to avoid a dangling USB one. Just in time, I saw that Silverstone had released the FPS01, a Slimline card reader.
So, the decision was made: I’d go with the PC-Q36, mostly because of the looks. The other cases were too small for larger CPU aircoolers and didn’t accommodate 3.5” hard drives.
Motherboard: ASUS ROG Strix Z270I Gaming
Choosing a motherboard was tough. It came down to the ASRock Fatal1ty Z270 Gaming-ITX or this ASUS board. The decision was between a Thunderbolt 3 port or two M.2 slots for another SSD. I went with the latter. Otherwise, the two boards are very similar, especially since I wasn’t aiming for extreme CPU overclocks.
CPU: Intel Core i7 7700K
Not much to add here. It’s Intel’s overclockable high-end mainstream processor, slightly better than the 6700K. I like the added H.265 decode support.
RAM: 2x16GB Corsair Vengeance LPX DDR4-3000
These 3000MHz CL15 sticks offered the best price/performance. Dual rank limits potential overclocking, but that’s expected.
Graphics card: Nvidia GeForce GTX 1080Ti Founder’s Edition
This was the part I was most excited about. The GTX 1080Ti offers a solid 30% performance bump over the GTX 1080, and coming from a GTX 680, it’s a massive upgrade.
SSD: Samsung 960 EVO M.2 500GB
The case had room for 3.5” and 2.5” drives, but with two M.2 slots on the motherboard, I opted for the 960 EVO for its price/performance ratio—just shy of the PRO model.
CPU cooler: beQuiet! Dark Rock 3
I previously used a Scythe Ninja 3 Rev. B on my i7 2600K, which worked great but was huge. While the case could fit a large aircooler, I chose the Dark Rock 3 based on reviews and its sleek black look. In hindsight, I should’ve picked something else.
Fans: 2x Blacknoise NB-eLoop B12-PS
I stuck with what I knew. After replacing the old case fans in my Cooler Master with eLoops and being satisfied, I got two for this build - one for the CPU cooler and one for the exhaust.
PSU: Corsair RM650i
JonnyGuru (via Web Archive) recommended it, so I figured it was a solid choice. In retrospect, I should have gone for the RM650x or a similarly priced Seasonic unit, as I don’t use the Corsair Link feature, but no big deal.
First Start
Alright!
I got all the components, built the system, and powered it on. In Windows, I didn’t notice much of a difference in general snappiness. Makes sense, as the Windows Desktop Manager (WDM) isn’t that demanding. The M.2 SSD didn’t immediately blow me away either, likely due to software limitations or system latency when loading small files, like during boot. The upgrade wasn’t as dramatic as moving from a spinning hard drive to a SATA SSD.
So I had quite tepid expectations, but then several problems cropped up:
Coil Whine
First, I checked the CPU and GPU temperatures and compared the old and new systems using Unigine’s Heaven Benchmark. I knew from Gamers Nexus’ review that the Founder’s Edition GTX 1080Ti would run warm - similar to the GTX 680 - so I was prepared for the inevitable noise. However, I quickly noticed significant coil whine, even under a light load (even after lowering settings and enabling VSync). With the PC meant to sit on my desk, enduring the whine wasn’t an option, so I reluctantly returned the card.
And I didn’t order another immediately. The reference design was loud and inefficient at cooling, holding 1780MHz at 84°C under load - better than my old card for sure, but I decided to wait for other options. Eventually, more models arrived, but most were too thick (2.5 PCI slots). Luckily, EVGA released 2-slot coolers for the GTX 1080Ti. I settled on the EVGA GTX 1080Ti SC2, as the FTW3 model I wanted had no defined launch date. Thankfully, when the new card arrived, I noticed that it was free of coil whine.
Temperatures
From the start, the system had cooling issues I hadn’t experienced before. Four factors were at play: the case, the graphics card, Intel, and ASUS. And, of course, my ongoing quest for both performance and silence.
Intel
The Core i7 7700K is notorious for poor thermal performance, prompting Intel to advise customers against overclocking their overclockable CPU if they dislike the high temps. The culprit is the thermal paste Intel used between the silicon die and the heatspreader. Older Intel and most AMD processors were soldered, which offered better heat conductivity but at a higher production cost.
Since the 8th generation (Coffee Lake), Intel improved the paste, but temperature spikes persist. I eventually delidded the 7700K and replaced the paste with Thermal Grizzly Conductonaut, which offers much better thermal conductivity at 73 W/(m·K).
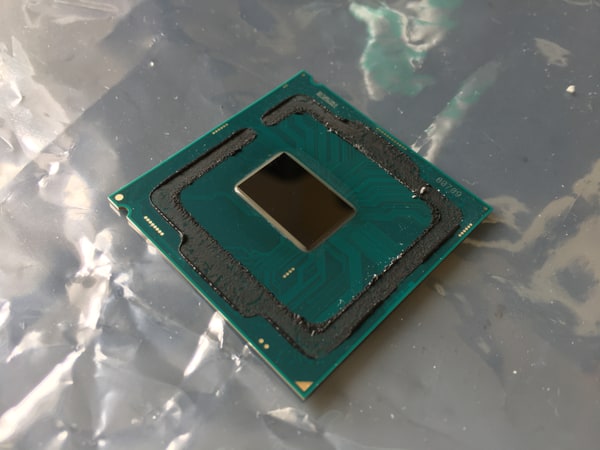
After reapplying the heatspreader with heat-resistant silicone, I saw temps reduced by about 19°C, and eliminated the fan speed spikes that happened by just moving the mouse on the desktop. I also used Thermal Grizzly Kryonaut between the heatspreader and the CPU cooler for good measure.
Graphics Card
This was my third self-built system, but the first where I had a wide choice of aftermarket graphics card coolers. Most modern graphics cards use open coolers with axial fans, which blow air through the fins and exhaust it into the case everywhere around them. But in small cases like mine, this meant hot air from the GPU directly warmed the CPU cooler.
With only two fans — one on the CPU cooler and one for exhaust — cooling was a challenge. I tried replacing the eLoop exhaust fan with three airflow-optimized Noctua NF-S12A fans. After mounting all three as case exhausts, CPU temps dropped significantly, making GPU overclocking feasible.
Using MSI Afterburner, I raised the GPU and memory clock speeds by +70MHz and +550MHz, respectively. This resulted in clock speeds of 2010-2110MHz, depending on temps, giving me a 4-8 FPS boost in games, though temps increased further.
Case
The Lian Li PC-Q36’s cooling design is deceptive. While it appears open, the positioning of the fan mounts in the side panels of the case creates issues. When case is closed, the graphics card would pull in air through the fan mounts right next to it. But, while they are perfectly positioned on the CPU side, on the graphics card side the perforations are too high up, with half of the graphics card’s fans obstructed by solid aluminum. This prevents proper airflow, and combined with dust filters, it’s basically a hotbox.
Removing the side panel on the GPU side significantly reduces impedance, dropping temps from 74°C to 66°C and 30% less fan speed. It’s a massive difference with high power draw components such as these.
Motherboard
In order to combat the graphics card situation, I attempted to rotate the CPU cooler 90° to help exhaust heat from the graphics card, but the Strix Z270I Gaming’s VRM cooler was too tall to fit under the Dark Rock 3. The same issue occurred with Noctua coolers, so I had to leave it as-is.
Interim Conclusion
The system has had its challenges, but it’s improved over time. I played DOOM (2016) shortly after assembly and hit 200FPS consistently, though the graphics card was really loud. Thankfully, I had closed-back headphones.
Recently, I upgraded to Noctua’s NF-A12x25 fans, which have a smaller than normal gap between the blades and housing, improving airflow by being better equipped for pushing against the impedance of the case’s side panels. These fans are incredibly quiet and lowered CPU temps by a few more degrees at the same noise level.
Performance
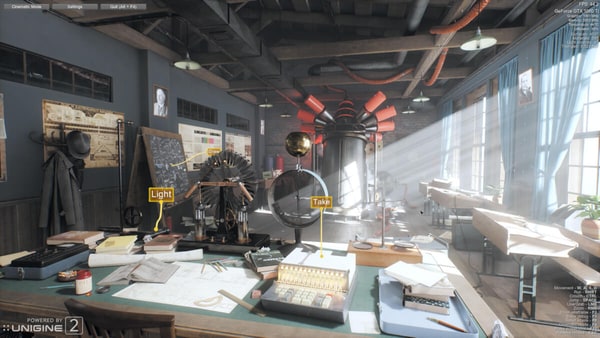
Now we get to the interesting part. I’ve compiled a few graphs showing the system’s performance in its current state. I started with Unigine’s Superposition Benchmark on the 1080p Extreme preset and logged data using MSI Afterburner. Superposition has little variation because it’s essentially a single room, which makes it a good benchmark, but it’s not fully comparable to modern games. I’ll use Final Fantasy XV later for a more realistic test.
Baseline
First, the out-of-box performance. Both the CPU and GPU are stock. Every test below shows a 10-minute load with cooling after the test.
The test starts at 00:01:25, visible in the framerate and frametime plot. The GPU temp rises, with voltage and clock speed bouncing around. The clock fluctuates between 1911MHz and 1923MHz, and the temperature peaks at 74°C, hitting a max of 1.043v. Power consumption occasionally exceeds the limit (up to 105%) with fans ramping to 2300rpm.
At this speed, the fans weren’t unbearably loud but still distinct from 1m away, generating a soft vacuum-like drone, albeit much quieter than an actual vacuum cleaner.
On to frametime analysis. Frametime is better than framerate for identifying stutters, because what we know as FPS averages all frametimes in a second. Stutters come from frames taking longer to render than others. MSI Afterburner can log the highest frametime in a second, so we can still spot stutters.
For a smooth 60FPS experience, each frame should take exactly 16.667ms to render. If one takes 20ms (50FPS) for example, you’ll feel a slight stutter. In this run, the average frametime was 12.825ms (78FPS). To assess stutters, we can look at the 99th and 99.9th percentiles, meaning the highest 1% and 0.1% of frametimes. These come out to 13.62ms (73FPS) and 15.784ms (63FPS), which means that every now and then performance dipped closer to 60FPS than 80FPS. Generally, if the slower to render frames are faster than 16.667ms, stutters aren’t noticeable if you’re targeting 60FPS. Watching the test, I would’ve noticed stutters if the slow frames exceeded that time.
With Overclock
Next, I overclocked the GPU by maxing voltage and power limits (+100 and 120%) and boosting the core clock by 66MHz and memory clock by 452MHz. Here’s the result:
The test starts at 00:01:29, with the clock now hovering around 2000MHz. Spikes in voltage hit 1.081v (1.09v is Nvidia’s max for Pascal GPUs). The GPU temperature sits around 79°C with fans at 2700rpm, generating a louder drone. Too loud for comfortable gaming in my book, especially with open-backed headphones.
The frametime analysis shows a slight performance boost: an average frametime of 12.143ms (82FPS), a 1% low of 12.705ms (79FPS), and a 0.1% low of 14.792ms (68FPS). While this only translates to a 4FPS increase, the slower frames render quicker, potentially preventing noticeable stutters in other cases.
Why Do Frametimes Stagnate?
Why the frametime stagnation? The camera stayed in the exact same position, showing the same scene for both tests. However, many factors affect frametime, from how dynamic the scene itself is, to GPU clock speed fluctuations, or even background processes.
For example, steam from the gravity generator consists of particles — two-polygon squares of varying size that spawn and disappear. Even if the particle system is coded in an optimized way, it’s still a process that can influence frametimes. The Superposition Benchmark shows the number of rendered polygons in the top-right corner, which constantly changes due to these dynamics.
Undervolting
You can’t achieve perfectly flat frametimes in a real game, but there’s more to consider. Both test cases were too loud and hot for my taste. The overclocked system pulled 415 watts from the wall, compared to 370 watts at stock. The GTX 1080Ti has a stock power limit of 250 watts, but I set it to 120%, allowing it to pull 300 watts, which it sometimes did.
Although power consumption matters to me, performance (in terms of gaming, acoustics, and thermals) is my priority, which is why I also tried undervolting. MSI Afterburner allows GPU voltage control. By pressing CTRL+F, you can adjust the voltage/frequency curve. After some trial and error, I found a curve that was stable for my card.
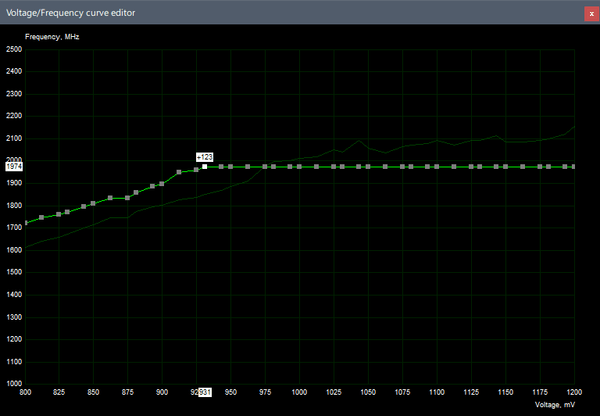
Even a slight reduction in voltage can cause crashes under varied loads (e.g., 3D Mark Fire Strike Extreme or any game or other load). After months without a crash, I’m confident my curve is stable. My goal wasn’t to squeeze every bit of performance, but to balance high clock speed with low voltage. Keep in mind, my curve won’t work for every GTX 1080Ti, as manufacturing tolerances vary between GPUs.
If your card crashes using my settings, increase the voltage at your desired clock speed. If it runs stable, try lowering the voltage or raising the clock speed. Or simply leave it as-is.
The key point is the highest point on the curve at 1974MHz and 0.931v. Beyond that, I’ve locked all voltage points to the same clock speed. As long as temperature, power and voltage allow, the GPU Boost algorithm will pick the highest possible clock at the lowest possible voltage, and by not providing the card the opportunity to boost the clock speed even higher, I ensure that’s the voltage/frequency point I’ll get in practice. I also set the power limit to 120% and raised the memory clock offset by 452MHz.
With Undervolt
Here are the results:
The test starts at 00:01:06. The voltage quickly stabilizes at 0.931v, and the clock speed starts out at 1974MHz, then settles at 1949MHz as temperatures rise, which was the goal of this voltage/frequency curve. The clock speed stays consistent throughout the test with the GPU temperature peaking at 70°C, while the fans spin at around 1870rpm — audible but without the annoying drone.
Interestingly, the power limit never fully engages, maxing out at 89% (222.5 watts). As temperatures climb, we see reduced power consumption, saving about 70-80 watts under load. Neat!
With the clock speed now stable, frametimes improve. We get an average of 12.506ms (80FPS), a 1% low of 12.954ms (77FPS), and a 0.1% low of 14.553ms (69FPS). Ignoring the first three seconds, the average is 12.5ms (80FPS), with a 1% low of 12.94ms (77FPS) and a 0.1% low of 13.15ms (76FPS). This notable improvement in the slowest frames can help prevent stutters, thanks to the stable clock speed.
To better illustrate the real-world impact, here’s a comparison of all three tests (x-axis starting at 50FPS to better illustrate the differences):
As expected, the undervolt test lands in the middle for average FPS. In comparison, the clock speed was lower in the baseline and higher in the overclock test. However, the minimum FPS improved by 12FPS, from 64FPS to 76FPS, allowing for more of a buffer for slow frames and reducing perceived micro stutters.
Performance in Games

Let’s look at in-game performance beyond benchmarks. I spent 10 minutes standing around Hammerhead in Final Fantasy XV, the game I’m currently playing. To ensure accurate data, I loaded the game beforehand, then tabbed out to let the system cool before starting the test. I also verified that tabbing out and back in didn’t affect performance. The test was conducted at 1920x1080 with the following settings:
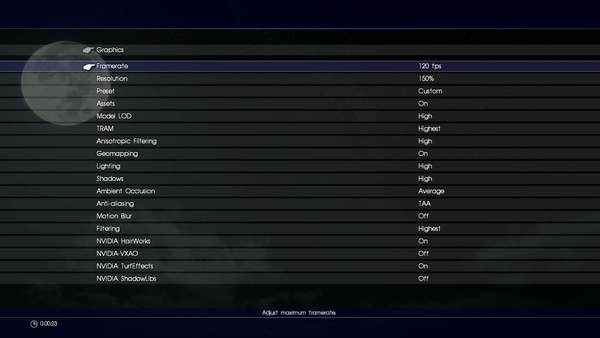
The framerate cap was set to 120FPS for this test (setting it to 60FPS would underutilize the GPU, keeping it cooler and quieter).
Baseline
First, the baseline performance with stock factory settings. CPU temperature and load percentage are included to show how the GPU impacts the CPU.
The test starts at 00:01:07. The clock speed starts out at 1987MHz and reaches below 1900MHz after about 90 seconds. Voltage fluctuates around 1v before stabilizing slightly below that. The GPU reaches 73°C, with fans spinning at 2100rpm, gradually increasing to 2200rpm by the end. A noticeable “vacuum drone” begins to appear around that point.
The power limit is similar to what I observed in the Unigine Superposition test, consistently above 90%, occasionally spiking past 100%. The CPU starts at 55°C, rising to 71°C due to the open GPU cooler design.
Interestingly, the GPU load fluctuates, which could indicate a CPU bottleneck (unlikely since the CPU load remained around 50%), a power or voltage limit on the GPU, or a game process momentarily stalling the CPU’s rendering thread. Game engines are complex, and this variability might be a result of dynamic factors, or it could simply be run-to-run variance.
For frametime analysis, I excluded the first two seconds to eliminate stutters from tabbing into the game. While the framerate paints a positive picture with an average of 77FPS, the frametime data shows discrepancies. MSI Afterburner logs the highest frametime in a second, not the average, which explains why the game still stutters despite decent FPS. Looking at the frametimes, we see an average of 17.706ms (56FPS), a 1% low of 26.66ms (38FPS), and a 0.1% low of 110.07ms (9FPS), reflecting noticeable stuttering.
At 00:05:14, a framerate increase correlates with the sunset, as disabling the sun’s light source reduces shadow calculations. When the moonlight source activates shortly after, FPS drops again due to resumed shadow processing.
With Overclock
Now, the same scene but with overclocked settings.
This test starts at 00:00:55. The clock speed hits 2050MHz but drops to just below 2000MHz within the first minute. Voltage remains above 1v throughout, and the GPU temperature rapidly rises to 83°C. Fan speeds sharply increase, reaching up to 3100rpm by the end. The vacuum drone disappears at around 2900rpm, but the wind noise was unbearably loud, making the machine uncomfortable to be around.
The CPU temperature is slightly raised compared to the baseline, spiking to 75°C. The GPU’s power limit exceeds 110% throughout the test. Frametime consistency improves over the baseline, but there are still occasional spikes. The average frametime is 16.508ms (61FPS), with a 1% low of 26.274ms (38FPS) and a 0.1% low of 29.614ms (34FPS). The average framerate was 83FPS, but there’s still a significant discrepancy between FPS and frametime data.
With Undervolt
Finally, the test with a custom voltage/frequency curve using MSI Afterburner.
The test starts at 00:00:48. Clock speed starts out at 1974MHz and drops to 1949MHz as temperatures rise. The voltage remains stable at 0.931v. GPU temperature peaks at 72°C, with the fans running at a more tolerable 2050rpm. Power consumption fluctuates early on before stabilizing between 90-96%. Interestingly, the GPU load is more stable here than in the other tests, though this could be due to run-to-run variance or background processes in Windows. The CPU temperature hovers around 68-70°C.
The fluctuating power and GPU load at the start are reflected in the frametime plot. The average frametime is 13.502ms (74FPS), with a 1% low of 21.748ms (46FPS) and a 0.1% low of 24.43ms (41FPS). Cleaning the data of early fluctuations, the average frametime improves to 13.064ms (77FPS), with a 1% low of 15.667ms (64FPS) and a 0.1% low of 16.331ms (61FPS). Once the fluctuations settle, the frametimes become more stable, with slower frames mostly staying above 60FPS.
And with that, this lengthy post comes to an end. I hope this demonstrates the real-world impact of undervolting your GPU, not just in benchmarks but in games too. Reflecting on the months-long journey, I wish I had explored the PC case market more thoroughly to avoid the hassle of cooling high-end components in a Mini-ITX case. Ironically, I now find Lian Li’s PC-Q37 more appealing than I initially did. But the grass always seems greener.